Note
You can download this demonstration as a Jupyter Notebook
here
Custom widgets
This guide shows how to create custom widgets with the IPySimulate package.
[1]:
import agentpy as ap
import ipysimulate as ips
import ipywidgets as widgets
The source code for custom widgets is written with javascript functions.
These functions can acess the widget’s current view and model with view and view.model. The visible cell can be accessed with view.el. To learn more about widget views and models in Jupyter, visit ipywidgets.
Functions can further acess the D3js library with d3 that provides very useful tools for data visualization. To learn more about D3js, go to https://d3js.org/. Finally, configuration data can be accessed with view.model.config.
To start, we define a dictionary in which the javascript functions will be placed as strings.
[2]:
source = {}
The first function is setup, which is called only once when the widget is first rendered. The code is adapted from Mike Bostock’s example for Modifying a Force Layout and displays a set of loose nodes within a force layout.
[3]:
source['setup'] = """
// Append a div container to outline the chart

var container = document.createElement("div");
container.className = 'ipysimulate-chart'
view.el.appendChild(container);

// Create a svg canvas

var svg = d3.select(container).append("svg")
    .attr("style", "width: 100%; height: 100%")
    .attr("viewBox", [0, 0, 100, 100])
    .append("g");
var g = svg.append("g")
    .attr("transform", "translate(" + 50 + "," + 50 + ")");
var node = g.append("g")
    .attr("stroke", "#fff")
    .attr("stroke-width", 1.5)
    .selectAll(".node");

// Prepare simulation

view.nodes = [];

var simulation = d3.forceSimulation(view.nodes)
    .force("charge", d3.forceManyBody().strength(-5))
    .force("x", d3.forceX())
    .force("y", d3.forceY())
    .alphaTarget(1)
    .on("tick", ticked);

function ticked() {
  node.attr("cx", function(d) { return d.x; })
      .attr("cy", function(d) { return d.y; })
}

// Function to restart the simulation with new nodes

color = d3.scaleOrdinal(d3.schemeSet3);
view.draw_nodes = function() {

  let nodes = view.nodes

  // Apply the general update pattern to the nodes.
  node = node.data(nodes, function(d) {return d.id;});
  node.exit().remove();
  node = node.enter().append("circle")
      // Decide color based on current time-step t
      .attr("fill", function(d) { return color(d.t); })
      .attr("r", view.model.config['radius'])
      .merge(node);

  // Update and restart the simulation.
  simulation.nodes(nodes);
  simulation.alpha(1).restart();
}

view.draw_nodes();
"""
We now add a second function update that is called every time new simulation data is synched. The passed data can be accessed as data. We will late define the data object to contain an entry t with the current time-step.
[4]:
source['update'] = """
// Create node out of new data
view.nodes.push(data)
view.draw_nodes()
"""
Finally, the reset function can be used to clear stored data when the simulation is reset.
[5]:
source['reset'] = """
view.nodes = [];
"""
We now prepare an empty model using the AgentPy package. Without any custom modifications, this model will simply increase it’s time-step t at every simulation step.
[6]:
model = ap.Model()
Next, we set up the IPySimulate Control widget with a slider for the frame-rate (fps) and a display of the current time-step t.
[7]:
parameters = {'fps': ap.IntRange(1, 10, 5),}
control = ips.Control(model, parameters, variables=('t'))
Now we can finally set up our custom widget, using CustomWidget to which we pass our control widget and source code for visualization. We further define a data collector that will retrieve the time-step t from the model.
[8]:
my_custom_widget = ips.CustomWidget(
    control,
    source=source,
    config={'radius': 3},
    data={'t': 't'}
)
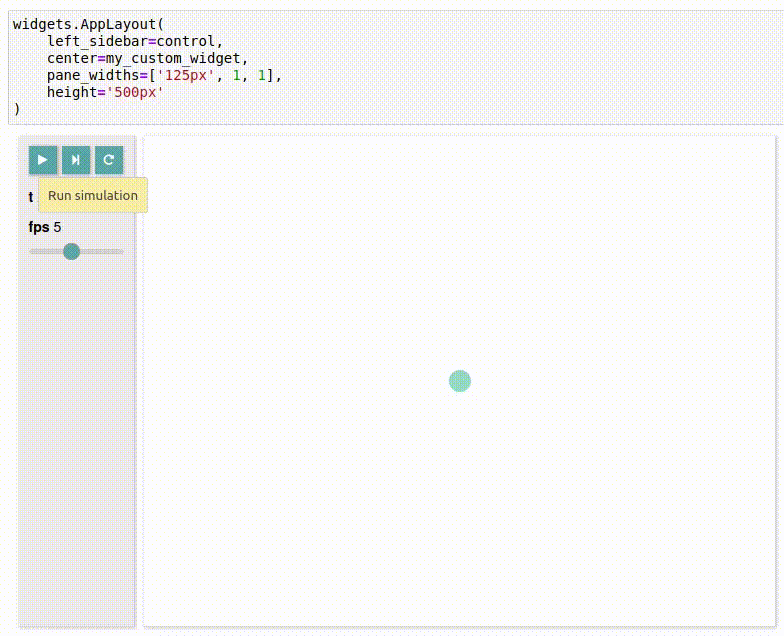
To display both our control and custom widget, we can use the classic AppLayout widget. To learn more about widget layouts, visit the ipywidgets documentation.
[9]:
widgets.AppLayout(
    left_sidebar=control,
    center=my_custom_widget,
    pane_widths=['125px', 1, 1],
    height='500px'
)
Note that the interactive simulation will not be visible if this tutorial is viewed within the IPySimulate documentation, but must be opened as a Jupyter Notebook (link at the top).
Here is a short recording of the interactive output: